My question is how to calculate image width based on where the vanishing point is in a parallax layer.
It’s possible to convey a sense of a depth in 2D video games using parallax, which in this case is when multiple layers of images move at different speeds when the screen scrolls.
For example, when a character moves, the screen scrolls at 100% speed. It makes sense for the layer depicting the ground the character walks on to scroll at this speed. But scenery in the background can be set to a slower speed, say 80%, to convey a sense of depth.
But what if I want to convey a sense of not just depth, but also perspective? It’s possible. The layers need to all line up at a specific point in the level—the vanishing point.
So for example, if I have an image of a room that is 100 pixels in length, and I want my vanishing point to be at the 70 pixel mark (70 pixels over to the right from the left edge of the room), how do I calculate the image width of a layer moving at 80% speed?
The above example uses nice, round numbers, but I’ll be working with images varying in width, vanishing point placement, and parallax speed.
The slower the parallax speed, the shorter the image width. But image width can also be changed to correct vanishing point alignment.
Attached is an image 100 pixels in length, representing the length of the room in the example that scrolls at 100% speed. The vertical blue line represents where I want my vanishing point (70 pixels over from the left edge of the image). Note that the y coordinate of the vanishing point doesn't concern me because for the time being, horizontal scrolling is complicated enough.
Attached is an image 100 pixels in length, representing the length of the room in the example that scrolls at 100% speed. The vertical blue line represents where I want my vanishing point (70 pixels over from the left edge of the image). Note that the y coordinate of the vanishing point doesn't concern me because for the time being, horizontal scrolling is complicated enough.
Don't understand what I'm looking at. Why is the vanishing point a line? I expected to see some 2d representation of a 3d room. Can you show a person and an object in the background? Where is the camera?
The vanishing point is a line to represent its placement on the x-axis. It's y-coordinate isn't necessary at this stage because I'm not attempting vertical scrolling—only horizontal scrolling. Therefore, a vanishing point placed anywhere along the vertical line would result in the same calculations for the image length that I'm trying to figure out. There is no 3D, this is all 2D. There is no camera. It's a 2D side scroller, as seen in numerous games for Super Nintendo and Sega Genesis, such as Sonic the Hedgehog 2, for example.
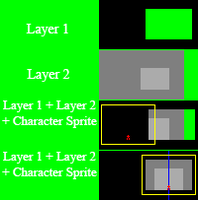
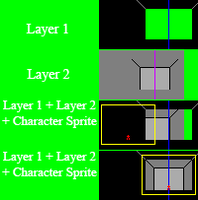
In this diagram, I show the room as separate layers in the top two examples, and then as combined layers in the bottom two examples. Layer 1, the foreground, goes on top of Layer 2, the background. The green represents negative space.
The middle two examples show the layers before any scrolling from left to right has taken place, while the bottom example shows the intended centered alignment of the layers when the red character sprite reaches the blue vanishing point. Everything inside the yellow border represents visible screen space (in this case, arbitrary dimensions with an arbitrary aspect ratio, since this isn't important for what I'm trying to calculate).
Notice Layer 2 is shorter in length than Layer 1, but this is currently by an arbitrary amount because that's the value I'm trying to figure out in order to crop Layer 2 and give it the correct length in order for it to line up centered at the blue line when it scrolls from left to right at 80% speed, starting at the left edge of the room that is 100 pixels in length.
The vanishing point is a line to represent its placement on the x-axis. It's y-coordinate isn't necessary at this stage because I'm not attempting vertical scrolling—only horizontal scrolling. Therefore, a vanishing point placed anywhere along the vertical line would result in the same calculations for the image length that I'm trying to figure out. There is no 3D, this is all 2D. There is no camera. It's a 2D side scroller, as seen in numerous games for Super Nintendo and Sega Genesis, such as Sonic the Hedgehog 2, for example.
In this diagram, I show the room as separate layers in the top two examples, and then as combined layers in the bottom two examples. Layer 1, the foreground, goes on top of Layer 2, the background. The green represents negative space.
The middle two examples show the layers before any scrolling from left to right has taken place, while the bottom example shows the intended centered alignment of the layers when the red character sprite reaches the blue vanishing point. Everything inside the yellow border represents visible screen space (in this case, arbitrary dimensions with an arbitrary aspect ratio, since this isn't important for what I'm trying to calculate).
Notice Layer 2 is shorter in length than Layer 1, but this is currently by an arbitrary amount because that's the value I'm trying to figure out in order to crop Layer 2 and give it the correct length in order for it to line up centered at the blue line when it scrolls from left to right at 80% speed, starting at the left edge of the room that is 100 pixels in length.
What are the dark and light grey areas? What is negative space?
You are saying that this is "all 2D". But isn't perspective projection an approach that allows you to simulate 3d environments? I don't see it in your diagrams. Where are the lines that go toward the vanishing point(s)?
Look for "Vanishing Points are Not Our Friend" here:
In a 2D parallax presentation, the scroll positions of all layers are calculated from a "master" scroll position within the scene. Each has a reference coordinate (often zero, but not necessarily) and a scrolling scale. As the master scroll position moves around, the layers are scrolled at speeds relative to that of the master position by the proportion of the scrolling scale.
So for example, if I have an image of a room that is 100 pixels in length, and I want my vanishing point to be at the 70 pixel mark (70 pixels over to the right from the left edge of the room), how do I calculate the image width of a layer moving at 80% speed?
This isn't quite enough information: the room has a width, and the viewport (the "screen") has its own width. Let's say for the sake of this illustration that the room is [MATH]1000[/MATH] pixels wide and the viewport is [MATH]100[/MATH] pixels wide. At any given time, [MATH]100[/MATH] pixels of the [MATH]1000[/MATH] in the room are visible within the viewport.
Let's assume that the master scroll position farthest to the left is zero. Let this be the coordinate of the left edge of the viewport. As the viewport scrolls to the right, the room essentially shifts to the left proportionally. The maximum master scroll position is the coordinate of the left edge of the viewport where the right edge of the viewport reaches the end of the room (or else it will have "scrolled too far"). Since the room is [MATH]1000[/MATH] pixels wide and the viewport is [MATH]100[/MATH] pixels wide, this makes the maximum master scroll position:
... which is proportional to the maximum master scroll position. The width of the layer, then, must be this plus another 100 pixels in order to be displayed in the viewport at that position, which makes its width:
[...] I want my vanishing point to be at the 70 pixel mark (70 pixels over to the right from the left edge of the room), how do I calculate the image width of a layer moving at 80% speed?
Since we're working in a bit of a different scope now, let's adjust the example so that all of the layers line up at the [MATH]700[/MATH] pixel mark. Specifically, when the 700th pixel from the left of the room measured by the master scroll position is in the center of the viewport, the corresponding graphics for the background layers are also lined up.
The master scroll position that presents the 700th room pixel in the center of the viewport is computed as:
When the master scroll position is at 650, the pixel in the center of the viewport is lined up across all layers. The corresponding scroll position in the 80% layer is trivially computed as:
In it, a slider is present that ranges from 0 to 900, representing the master scroll position. A black rectangle represents the viewport and is 100 pixels wide (inside the black border). A long green rectangle represents the room and is 1000 pixels wide, and a long red rectangle represents the 80% layer and is 820 pixels wide.
Moving the slider will move the red and green rectangles appropriately behind the viewport. There are marks on the red and green rectangles at coordinates 570 and 700 respectively.
When moving the slider to position 650, you can see that the marks on the two layers line up, and they do so in the center of the viewport.
Attached is an image showing what it's supposed to look like:
That should get you started. You'll surely have questions, so I'll be checking back often just in case.
What are the dark and light grey areas? What is negative space?
You are saying that this is "all 2D". But isn't perspective projection an approach that allows you to simulate 3d environments? I don't see it in your diagrams. Where are the lines that go toward the vanishing point(s)?
The purpose of the two shades of gray are to indicate the structure of the environment and depth that are drawn onto that layer, and to show how the art on that portion of the layer lines up centered with the blue line when Layer 2 scrolls at a slower pace than Layer 1, as shown in the bottom example. Notice how there's an equal part of the light gray rectangle on either side of the blue line in the bottom example. It only appears aligned this way when the character travels to the blue line. The centering of that portion of Layer 2 in relation to the blue line is part of what helps create the illusion of depth and perspective, because when the character stands in the center of that opening that shows Layer 2 behind it, the art drawn onto Layer 2 appears centered with that opening.
Negative space is space that doesn't have anything, or in this case, where there are no pixels in the actual layers, and the result is transparency. For example, the space cut out from the inner section of Layer 1 allows us to see Layer 2 behind it.
I've updated the diagram to show lines converging to the vanishing point/blue line. But note that these lines only appear to properly converge to the blue line when the purple line in Layer 2 occupies the same space as the blue line in Layer 1, as seen in the bottom example. That's why I say it conveys a sense of perspective—as opposed to implementing actual perspective. I've also corrected an error in the third example, which in previous diagrams featured an incorrectly shaped rectangle cut out of Layer 1. I also decided not to update the diagram to reflect Mr. Blank's reply, because it would need to be remade from scratch to be completely accurate. But I think his reply is all anyone needs who has the same question I did.
This site uses cookies to help personalise content, tailor your experience and to keep you logged in if you register.
By continuing to use this site, you are consenting to our use of cookies.